
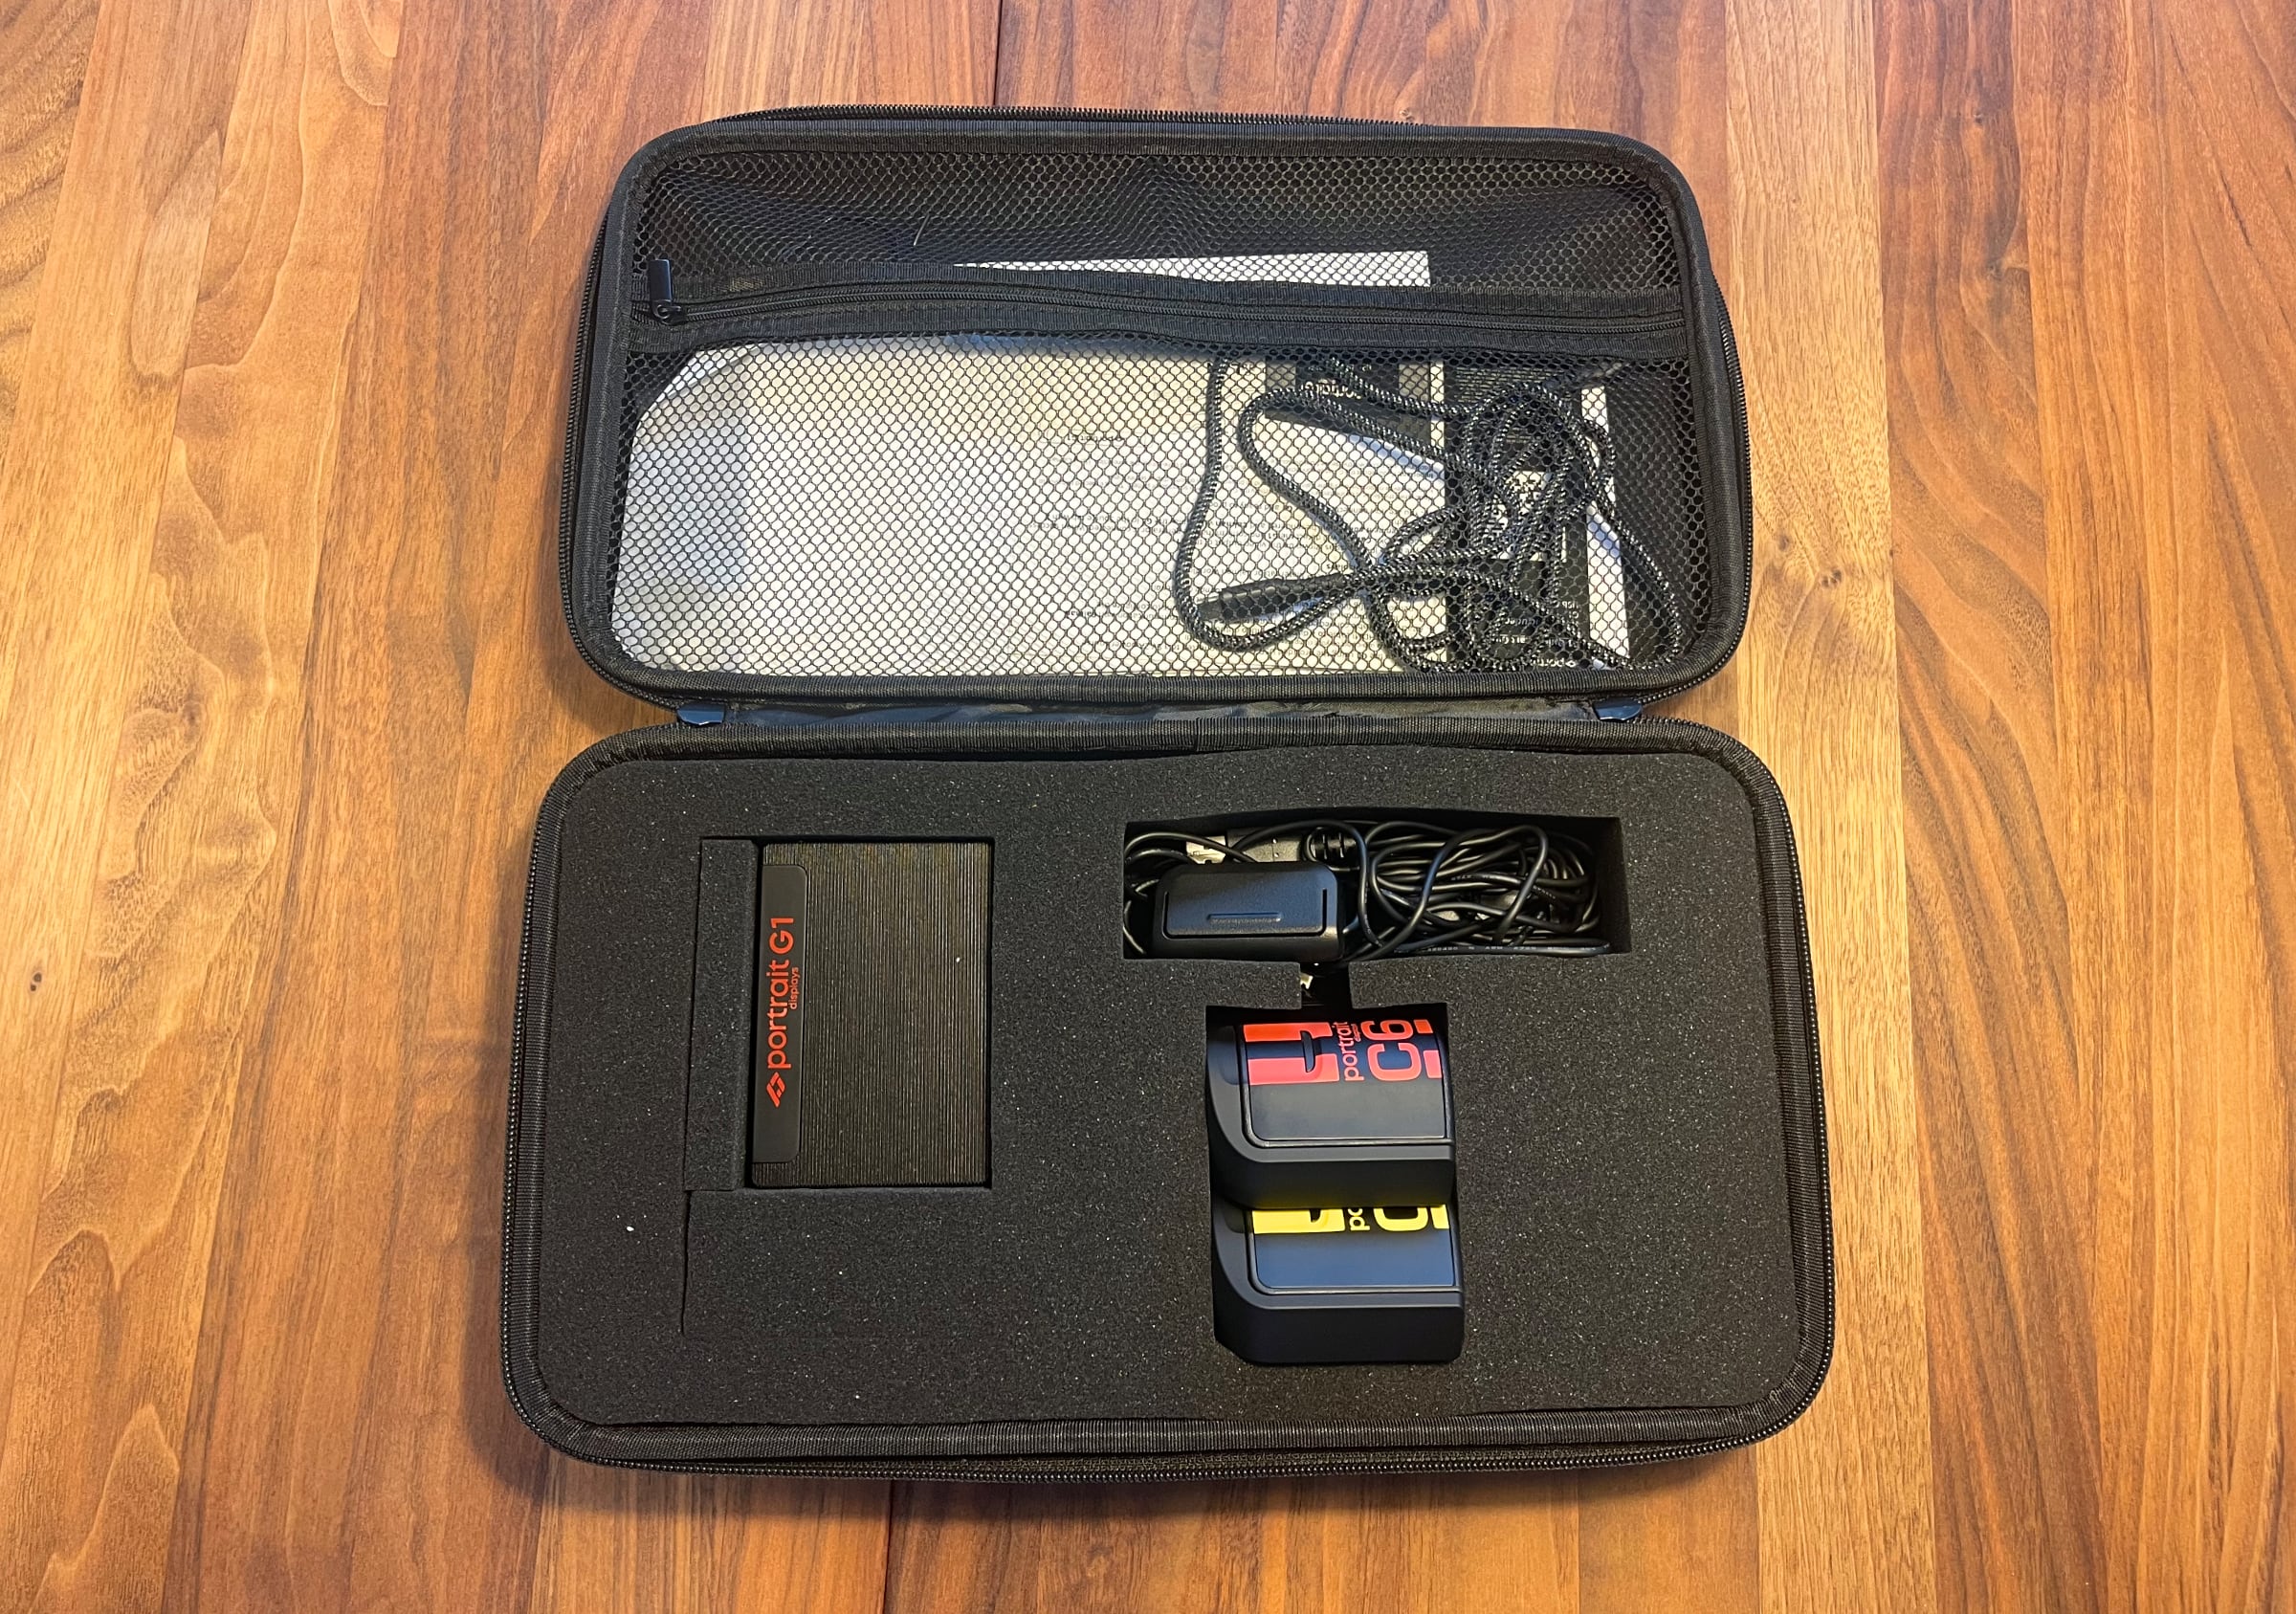
Calman calibration starter kit
Display calibration has historically been an expensive and quite complex affair, but with Portrait Displays' new bundle consisting of the C6 HDR5000 meter, G1 pattern generator, and Calman software, it becomes far more accessible. We tested the bundle to see whether getting optimal picture quality at home has truly become easier and more affordable as compared to our own significantly more expensive equipment. The two hardware devices plus the Calman software cost around 650 USD as a bundle. You can get started for even less if you already own a compatible meter.Price and retailer:
What is display calibration?
The purpose of calibration is to get the screen to display the colors and luminance that the signal is asking for – no matter what those colors or levels may be. It is a measurable and factual process, though there are some nuances. It is not about user preferences, unless you want to deviate from industry standards. Calibration is necessary to ensure the video ecosystem works properly: that what the content creator intended is what you see in your living room. This stands in contrast to the wild west. If TV manufacturers push a bluish image with heavily saturated colors – which they do, to varying degrees – then the content creator has no way of knowing what's being shown on a TV at home. If the creator wants a yellowish tone, it turns blue. If they want blue, it becomes doubly blue – an extreme. This benefits no one except TV manufacturers who boost retail sales with eye-catching colors. You do not see this kind of chaos in movie theaters showing Hollywood films because there are strict specifications (DCI). To calibrate a display, you place a measuring device on it. Are the colors being reproduced correctly, or are they off? And by how much? As part of the calibration process, you will also make a series of adjustments – often disabling things – in the TV's picture menu, like turning off motion smoothing and image processing. However, at its core, calibration is about adjusting color and grayscale. The point I am making is that even if you own a meter, you still need knowledge, because calibration alone does not disable noise reduction or motion smoothing on your TV.
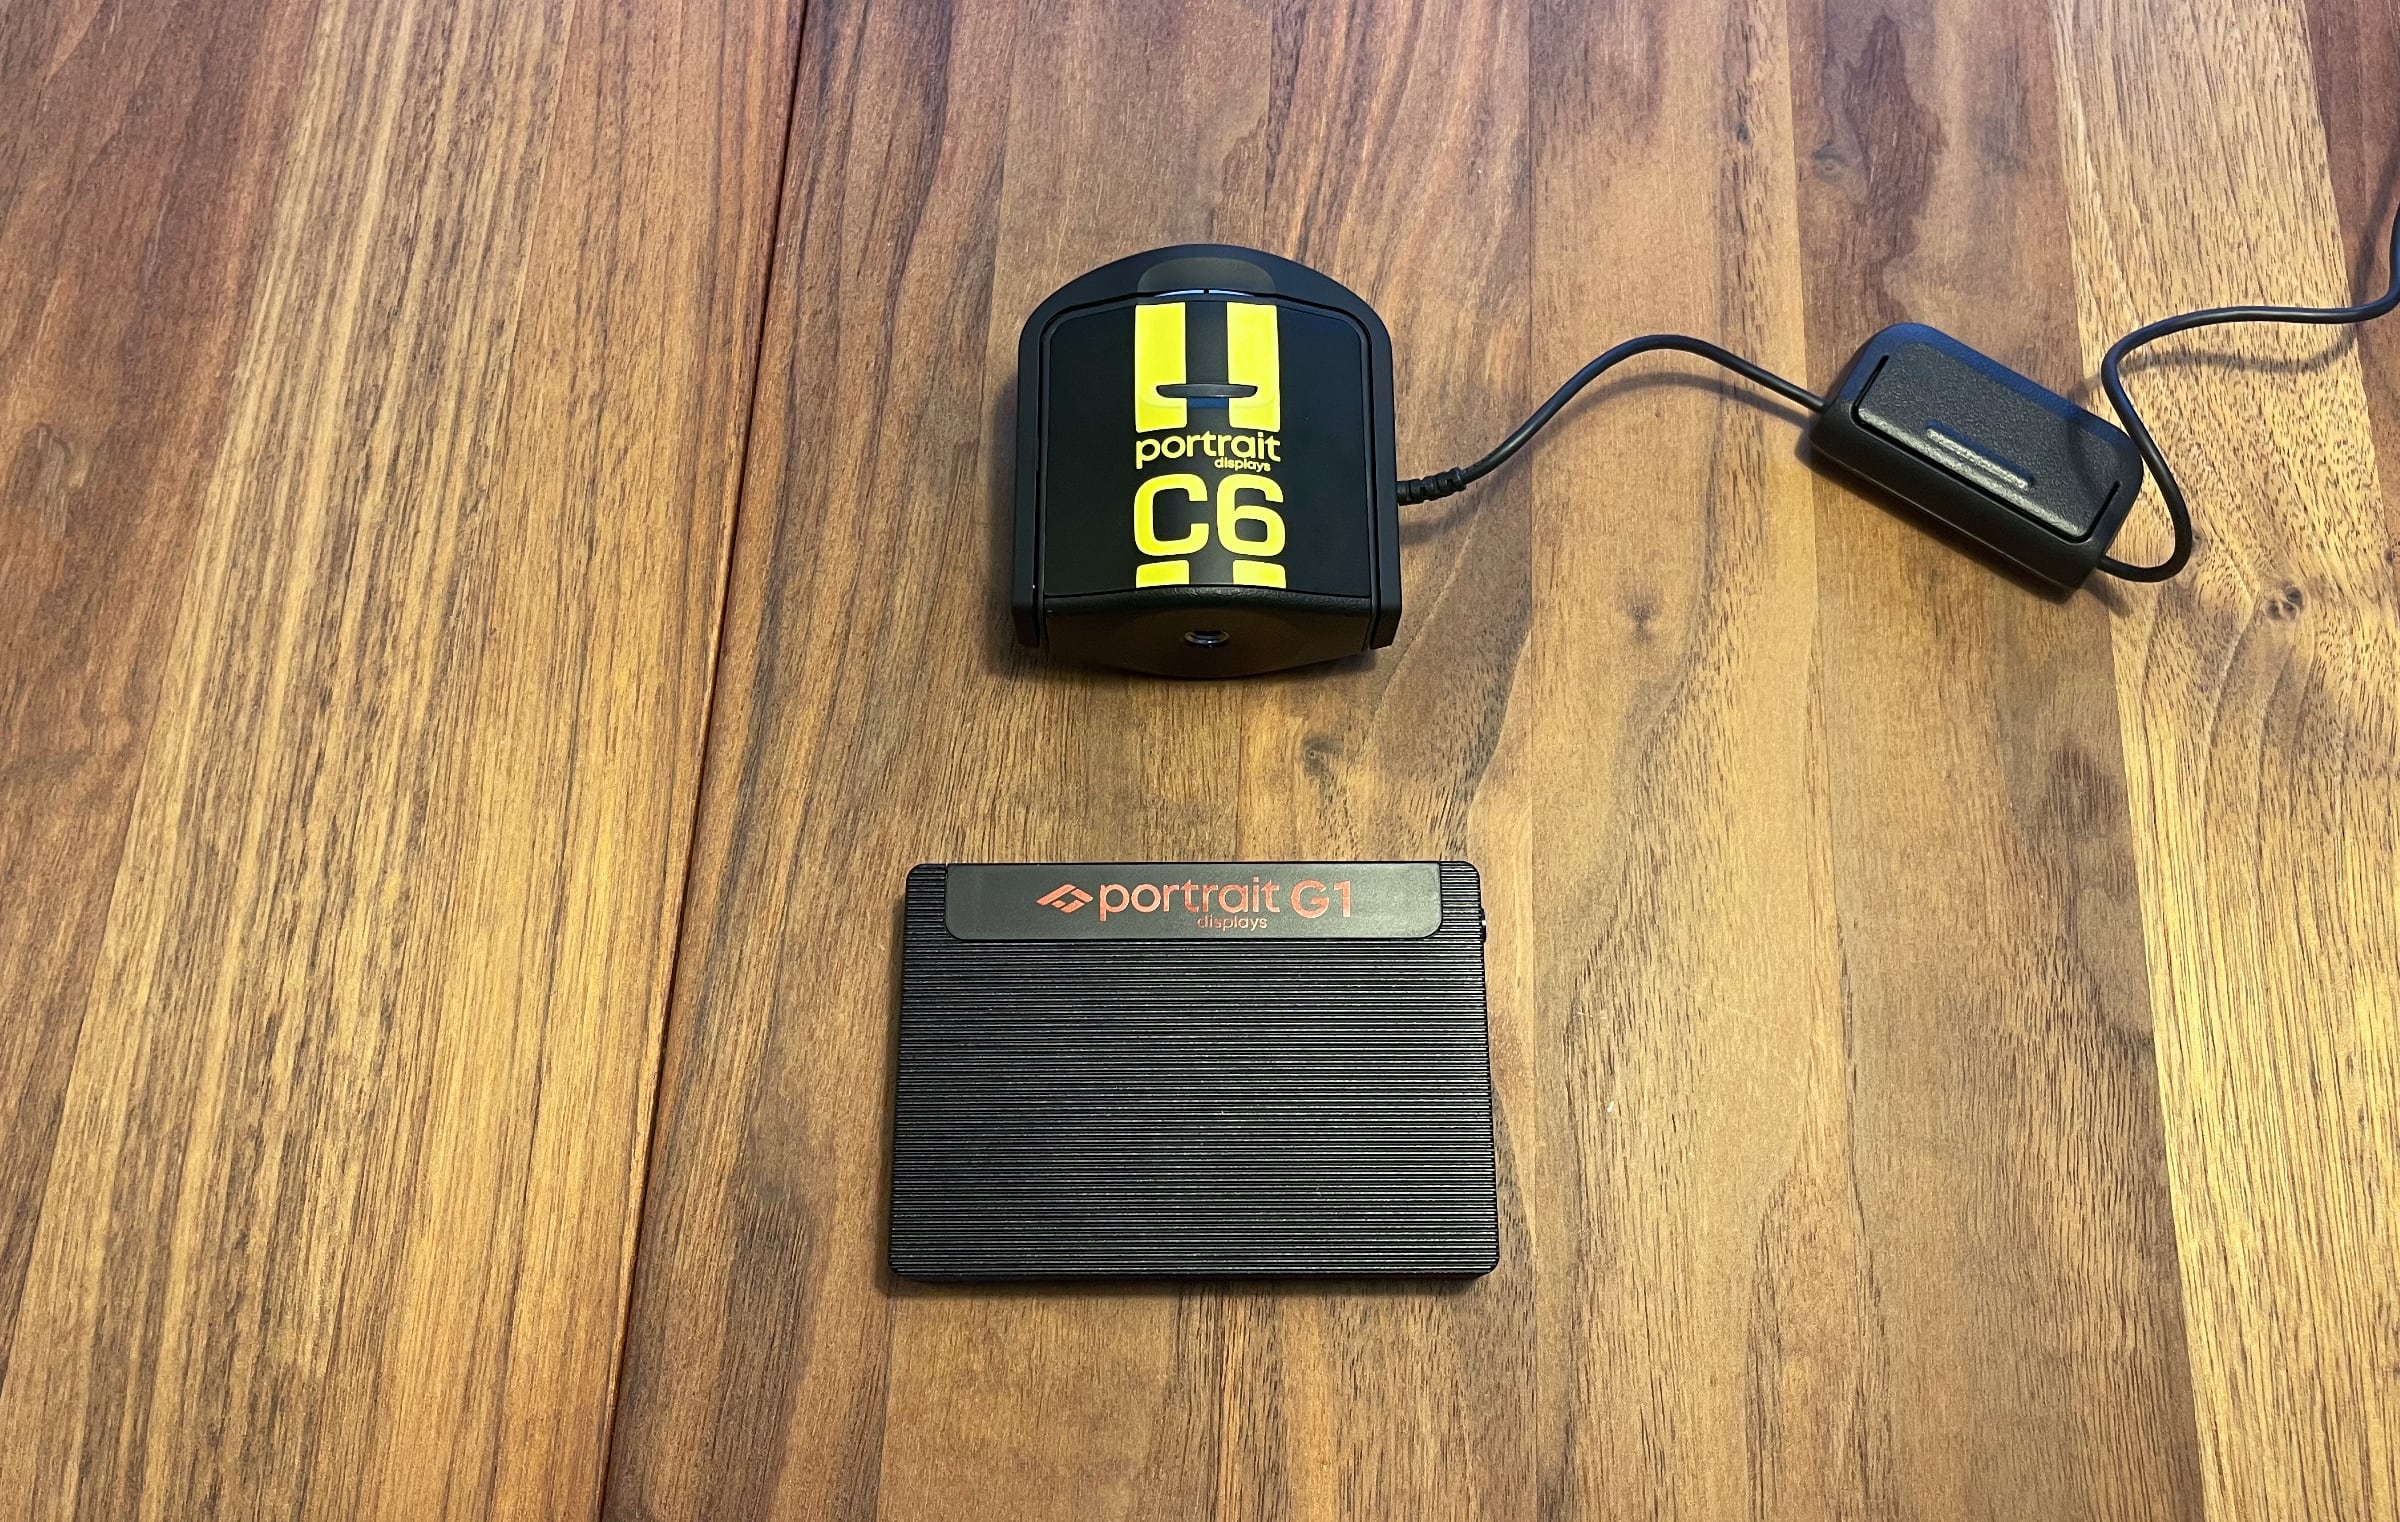
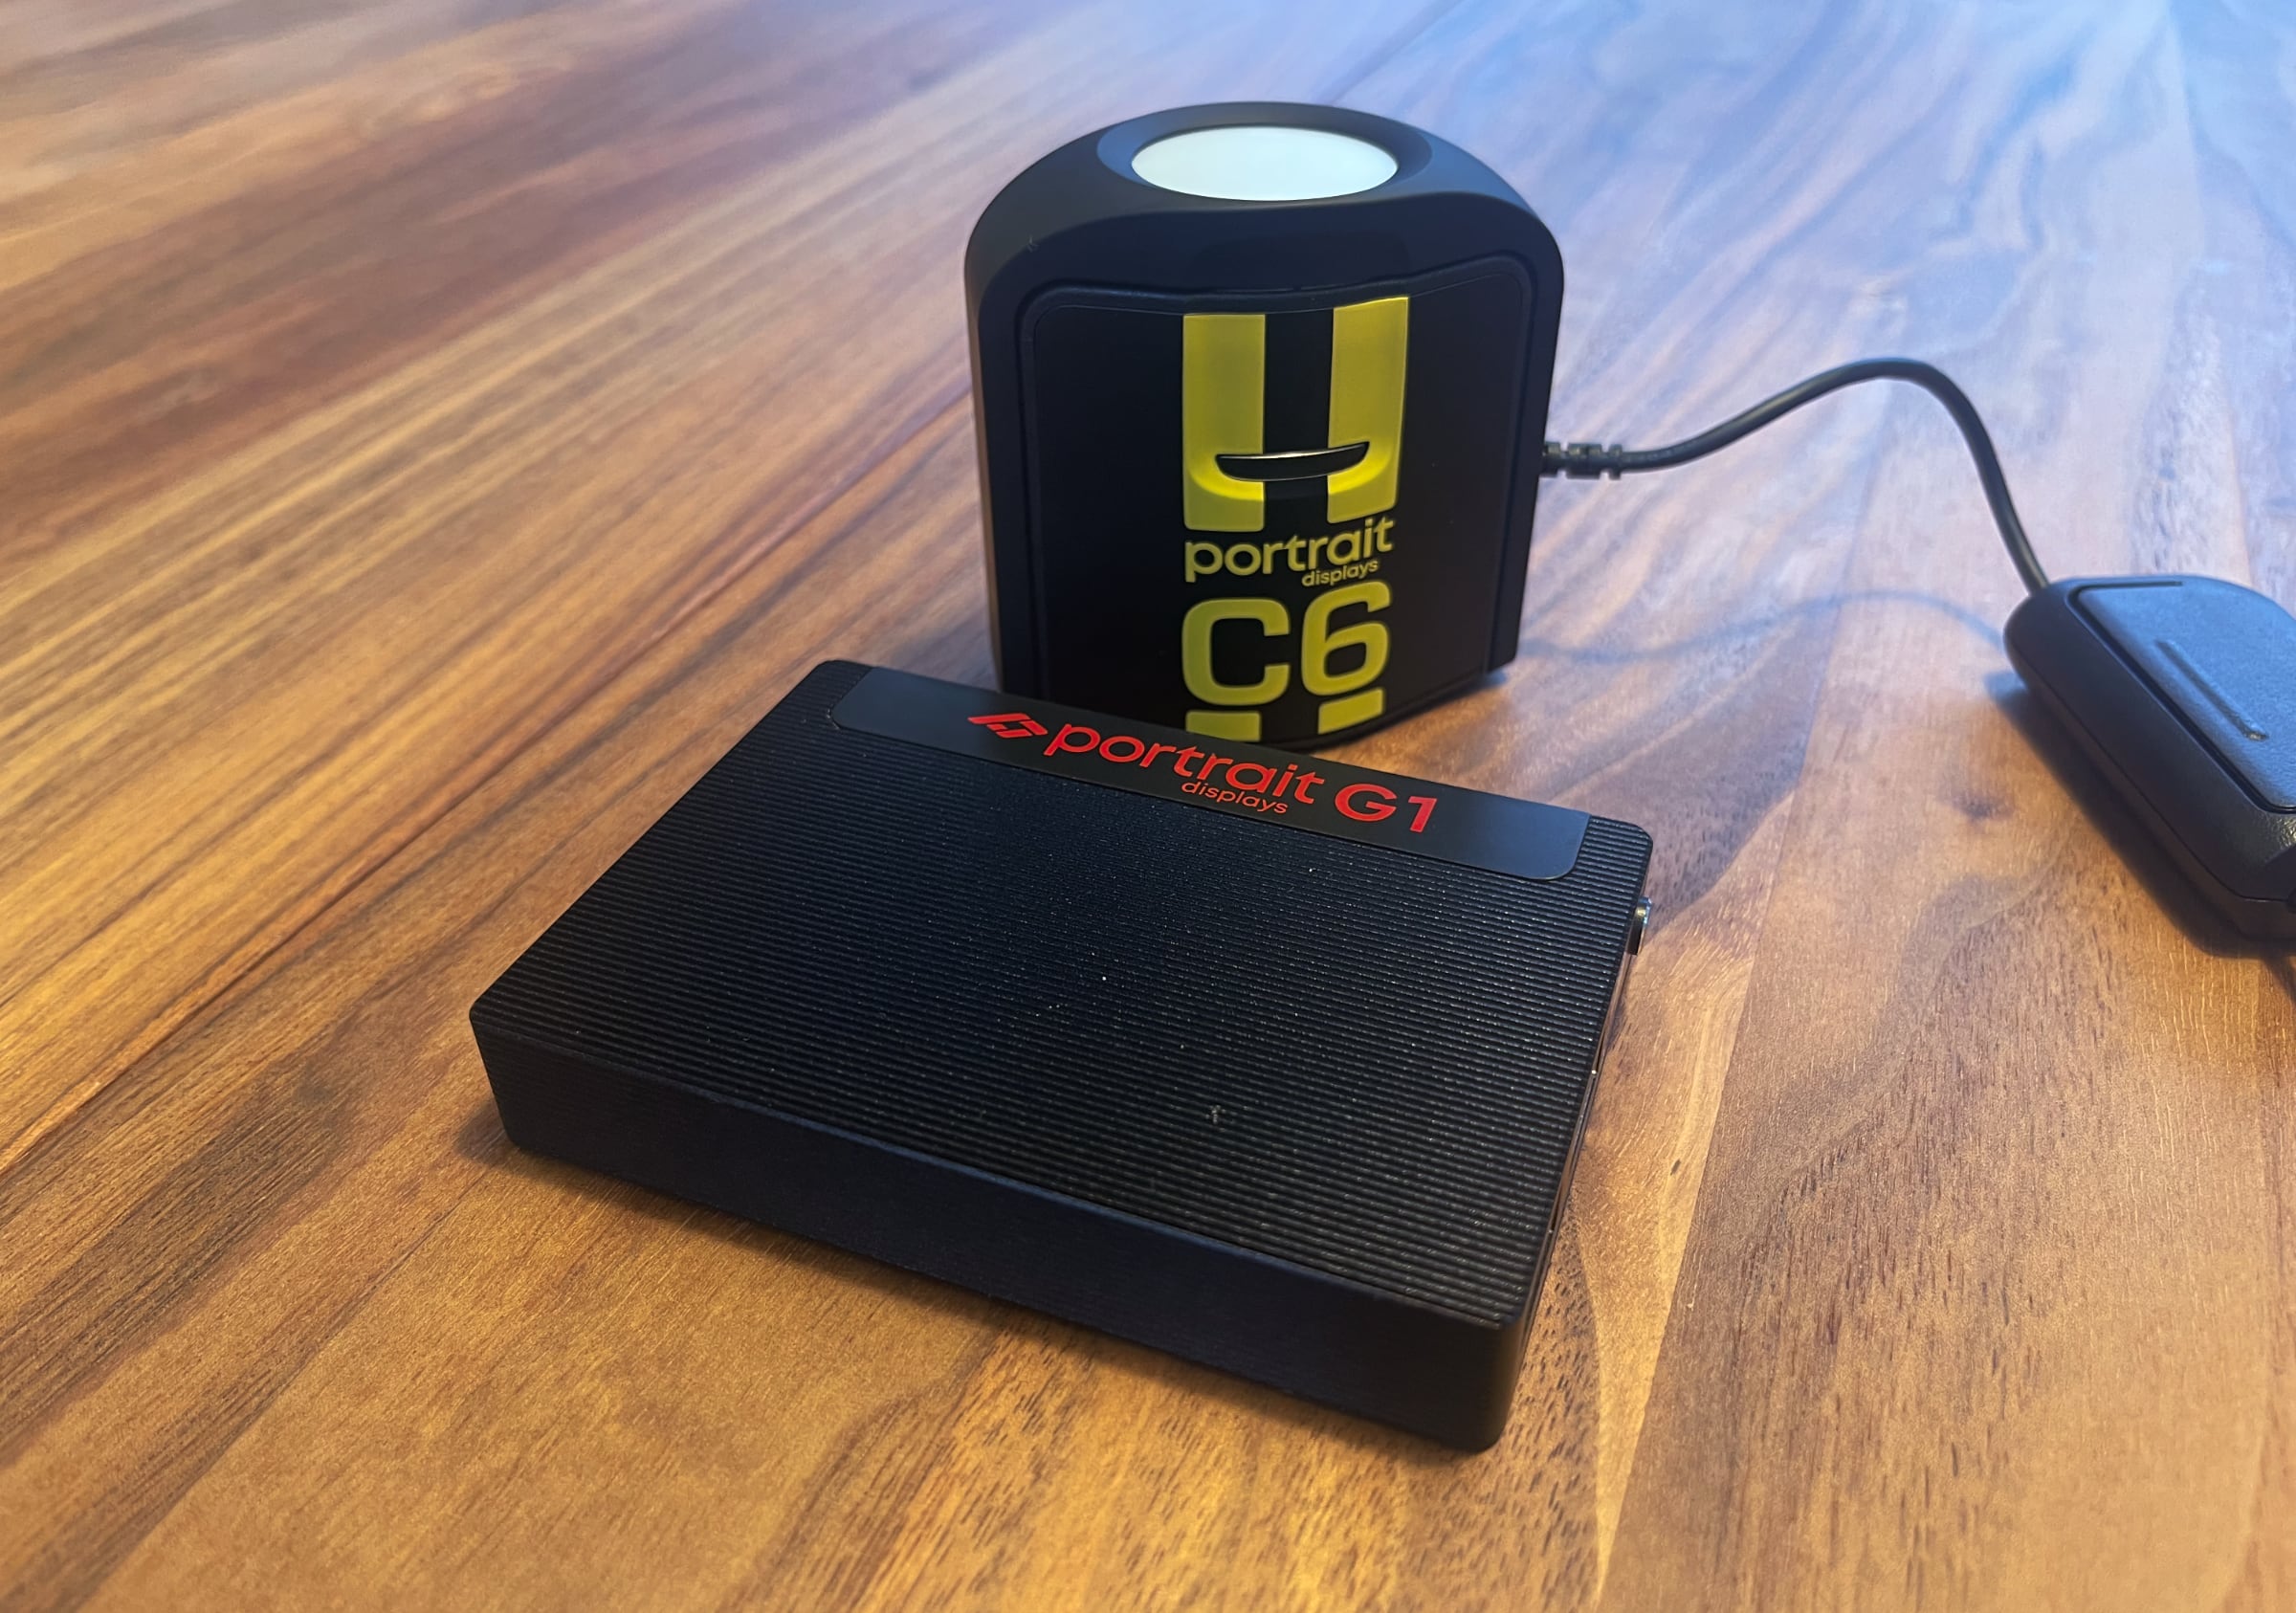
The meter is placed on the screen to measure colors and brightness. Photo: FlatpanelsHDThere are different types of meters, generally divided into two categories: colorimeters and spectrophotometers. In short, colorimeters are usually cheaper and slightly less accurate (but faster), while spectrophotometers are more expensive and more precise (but slower). For most users, colorimeters are "good enough". Portrait Displays' C6 is a colorimeter and has long been available in a red version (C6 HDR2000), which Flatpanels owns along with several other meters. There is now a new yellow version called C6 HDR5000. The number indicates that it is designed to measure accurately up to 5000 nits of peak luminance. It can measure higher, but accuracy is no longer guaranteed beyond that point. Aside from the color, the devices look nearly identical. Both are based on X-Rite meters, specifically the i1Display3.
The yellow meter is the new C6 HDR5000, and the red one is the older C6 HDR2000. Photo: FlatpanelsHDIn addition, you need test patterns shown on the screen in order to take measurements – patterns that have specific shades of red, green, blue, yellow, purple etc., at specific brightness levels. There are three main ways to display these patterns:When FlatpanelsHD first started calibrating, we used test patterns from a PC. It was flexible and cheap, but a manual process – you had to switch patterns, measure, switch patterns, measure. It was time-consuming. It worked well in an SDR environment but became unmanageable when HDR entered the scene. We moved away from PC patterns even before HDR, for other reasons. We transitioned to using a dedicated pattern generator, which is an external device, and have mainly used the so-called VideoForge Pro for many years. You still need a PC to run the software (Calman, for example), which is the third component in a calibration setup. But now the software automatically communicates with both the meter (C6, for example) and the pattern generator, instructing them to do things like: switch to red, measure, switch to blue, measure, etc. Using a pattern generator is much faster and makes HDR calibration feasible. However, VideoForge Pro costs at least 1500 dollars and the more feature-rich Murideo SIX-G costs 3000 dollars. The new G1 pattern generator costs 650 dollars when bundled with the C6 HDR5000 meter and Calman home software. G1 alone can be bundled with the Calman Home app (for a specific TV brand) for 350 dollars – if you already own a meter.
- A PC with test patterns connected to the TV
- An external pattern generator connected to the TV
- Built-in test patterns within the TV itself
The new, much more affordable Portrait Displays G1 pattern generator. Photo: FlatpanelsHDIn recent years, several TVs have launched with 'Calman Ready' support. This means that the TV is equipped to communicate directly with the Calman app, using either internal patterns in the TV itself (like LG or Panasonic) or from an external pattern generator. This lets you use 'AutoCal' – auto calibration – for the PC software to handle the calibration automatically and write the required values directly into the TV's picture menus (or submenus). FlatpanelsHD tested this back in 2019 in our review of LG C9 OLED. The drawback is, of course, that you can only auto calibrate displays that are 'Calman Ready'. The final component is the PC software. We have used Calman for years. This is where you define what you are trying to achieve. The software can both calibrate and measure – useful if you are curious about what your TV or monitor can or cannot do. We also use the software in our general testing workflow at FlatpanelsHD. In this review, we take a closer look at the C6 HDR5000 meter, the G1 pattern generator, and the Calman software – and compare them to the C6 HDR2000 and the significantly more expensive VideoForge Pro.Setup
To get started, you need to install the Calman app on a Windows PC (it is not available for macOS or smartphones) and make sure the pattern generator is on the same network (the C6 does not need to be network-connected), which is required for the Calman software to communicate with the generator during calibration, when the many different test patterns are shown and measured. If you have a Calman Ready TV, the TV also needs to be on the same WiFi or LAN network for you to use auto-calibration. The test patterns are then loaded either from an external pattern generator, such as Portrait Displays' G1 or the VideoForge Pro, or alternatively directly from within the TV itself, if it supports internal patterns (like LG and Panasonic). In that case, the TV serves as the pattern generator.
Calman on the PC communicates with the display meter and pattern generatorConnecting the G1 pattern generator to the network takes a bit of work, but it is easy enough if you follow the included guide. It also needs to be connected via USB for power and to the TV via HDMI. You now switch the TV to the HDMI input where the generator is connected. We already had Calman installed on our PC, though not the latest version. Drivers for the C6 HDR2000 do not work with the C6 HDR5000, and since Windows did not find them automatically, we went looking – but it turned out that was not necessary. You just need to install a newer version of Calman, which includes the required drivers. The C6 meter connects to the PC via USB, which provides both data and power. The cable is fairly long, but the PC still needs to be near the TV, so a laptop is recommended.How the Calman app works
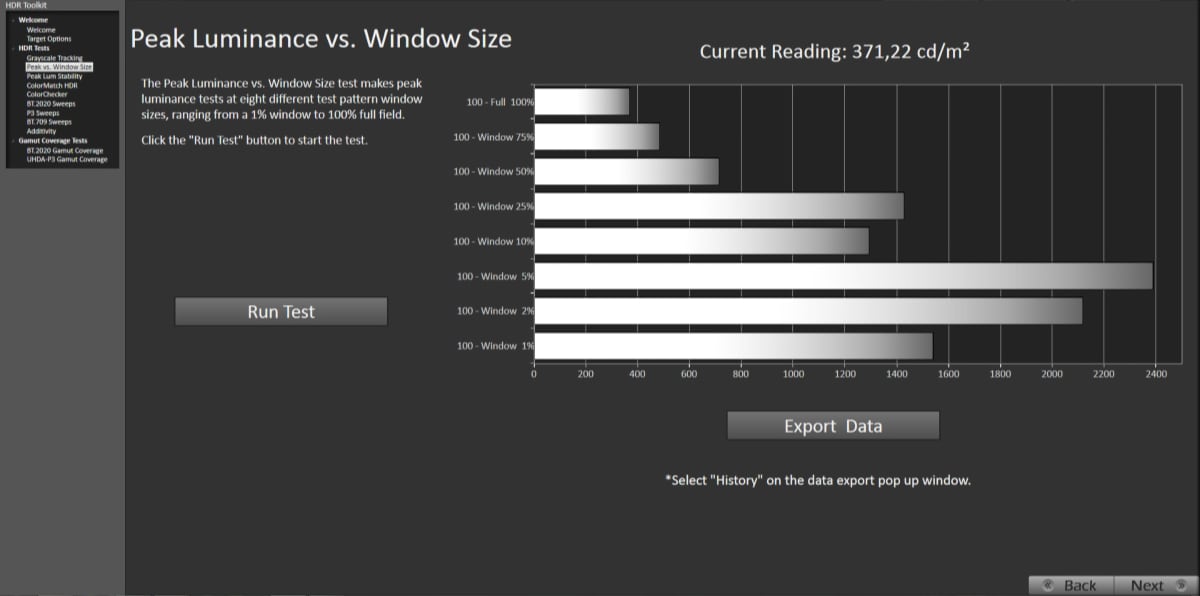
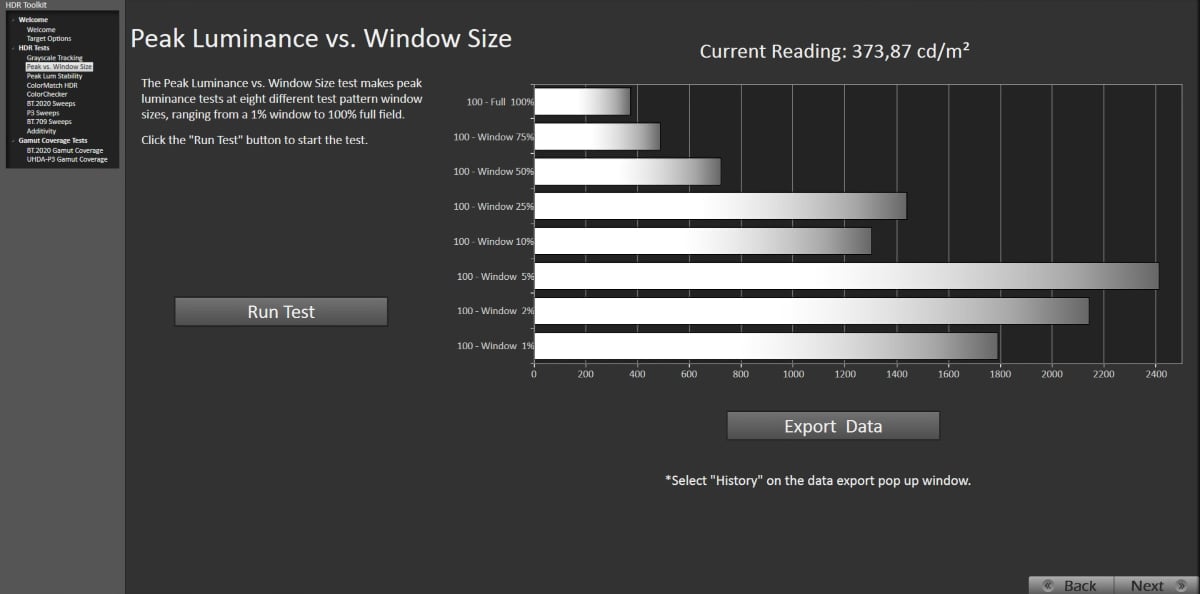
Once everything is set up, you are ready to calibrate many displays. For this test, we used an LG OLED TV and a TCL miniLED LCD TV, as they represent the two types of high-end displays most users will likely want to calibrate (LG OLED panels are used in all OLED TVs except QD-OLED, and TCL VA LCD panels are used in displays from many brands including Samsung and Sony). Start by placing the C6 meter in the center of the screen. You can use a floor stand or just let the counterweight on the cable hang behind the TV to keep the meter in place. Next, launch the Calman app, select C6 as your meter (from the Meter menu at the top) and G1 as your pattern generator (from the Source menu at the top). Then choose your screen type (LED LCD, WRGB OLED etc., again from the Meter menu), and you are ready to begin calibration and measurements. Depending on what you want to do, go to the Calman menu in the top-left corner (ours was red, yours might be green), and choose the relevant workflow, such as for SDR, HDR10, Dolby Vision – or something else entirely. When the workflow opens, you will define your target values, for example whether the screen is being calibrated for a bright or dark room. Note that we selected 'Window 10%' under 'Window Size', which means the test pattern shown on the screen fills 10% of the screen area. That is a good starting point for many displays, but again, it depends on what you are trying to measure and achieve. 'Delay' indicates how much time passes between each measurement. If the delay is too short, the screen might not have time to "reset", which could cause the previous reading to affect the next. This also depends on the measurement device. You can have Calman optimize the delay automatically. Calman offers a wealth of settings. The ones above are the most important, but once you get started with calibration, it is worth exploring and expanding your toolset with the more advanced settings available.From Calman's Meter menu, you can connect your C6 meter. Photo: FlatpanelsHDFrom Calman's Source menu at the top, you can connect your G1 pattern generator. Photo: FlatpanelsHDPortrait Displays' C6 and G1
Let us start with SDR. After loading a workflow, you will see the various steps in the calibration process in the left-hand menu of the Calman app. It is not always necessary to go through all of them – it depends on how well or poorly the screen is calibrated from the factory. As a rule of thumb, you begin with a 'Pre Calibration View' to get an idea of the picture accuracy out of the box. You start measurements using the buttons in the bottom-right corner of the Calman app. The 'Play' button performs just the single measurement shown in the color/greyscale bar at the bottom. The button next to it automatically measures the entire series of colors/greyscales by instructing the pattern generator to cycle through them. The infinity button measures continuously until you stop it. This can be useful during some calibration steps – for example, if the TV's picture menu is open and you make adjustments while Calman measures, to see the real-time effect. Note, however, that with OLED, you should close the TV's picture menus when measuring in Calman, as they can alter the screen's brightness. With LCD TVs, the goal is generally to make sure the on-screen menu does not block the C6's measurement area.
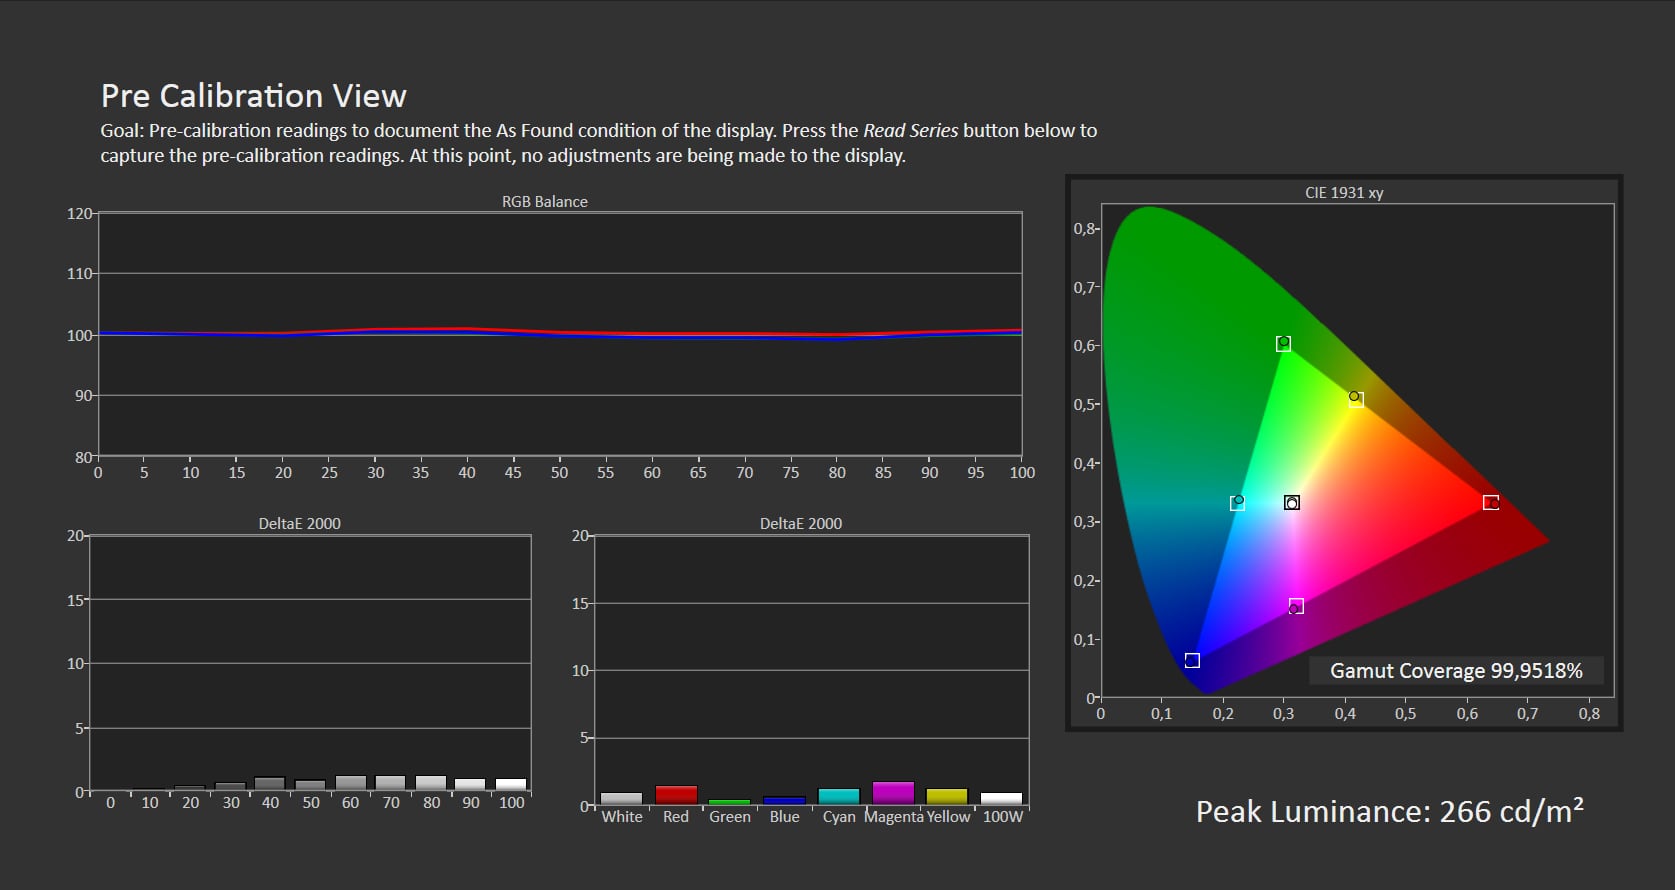
An example of a calibration process in progress in the Calman app. Photo: FlatpanelsHDIn our first example above, we "cheated" a bit and measured a very accurate picture mode to illustrate what you should be aiming for in Calman. For SDR, the goal in the 'RGB Balance' graph is to stay as close as possible to the center of the Y-axis (100 in older versions of Calman, 0 in newer ones) across the entire X-axis, from 0 (lowest brightness) to 100 (highest brightness). In the two graphs showing greyscale and colors below, you want DeltaE – the deviation – to be as low as possible. A general rule of thumb is that a DeltaE below 2 – some like to say 1 – usually is not perceptible to the human eye. So here we are very close to the target, and many would consider this "good enough" – except for "peak luminance" which hits 756.9 cd/m² (nits), an extremely high level in SDR, since it is a miniLED LCD TV. That brightness is for a full-screen white image – painful to look at indoors. Now you go back into the TV's picture menus, lower the brightness (LED backlight), and make any other adjustments using the options under "Base Settings" in the left menu. Finally, you run a 'Post Calibration View', which you can compare with your 'Pre Calibration View' to see the improvements. As mentioned, we cheated a bit with the example further up by using a profile that did not really need deep calibration, just to show what we are aiming for. A typical TV looks more like this out of the box in its default picture mode, for example Standard or Vivid:
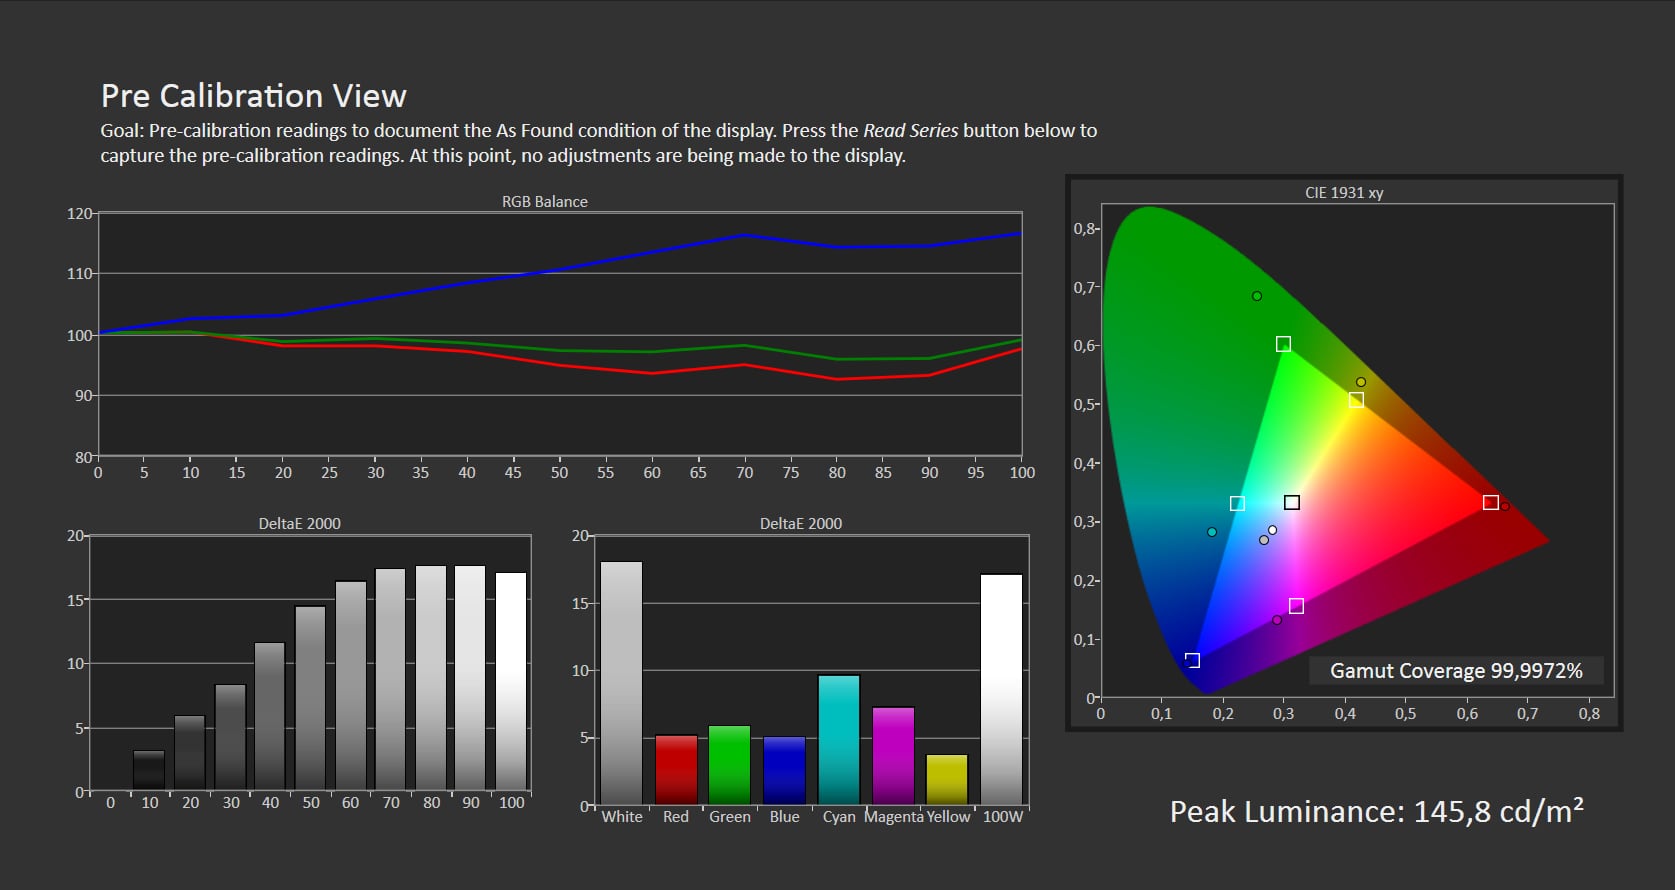
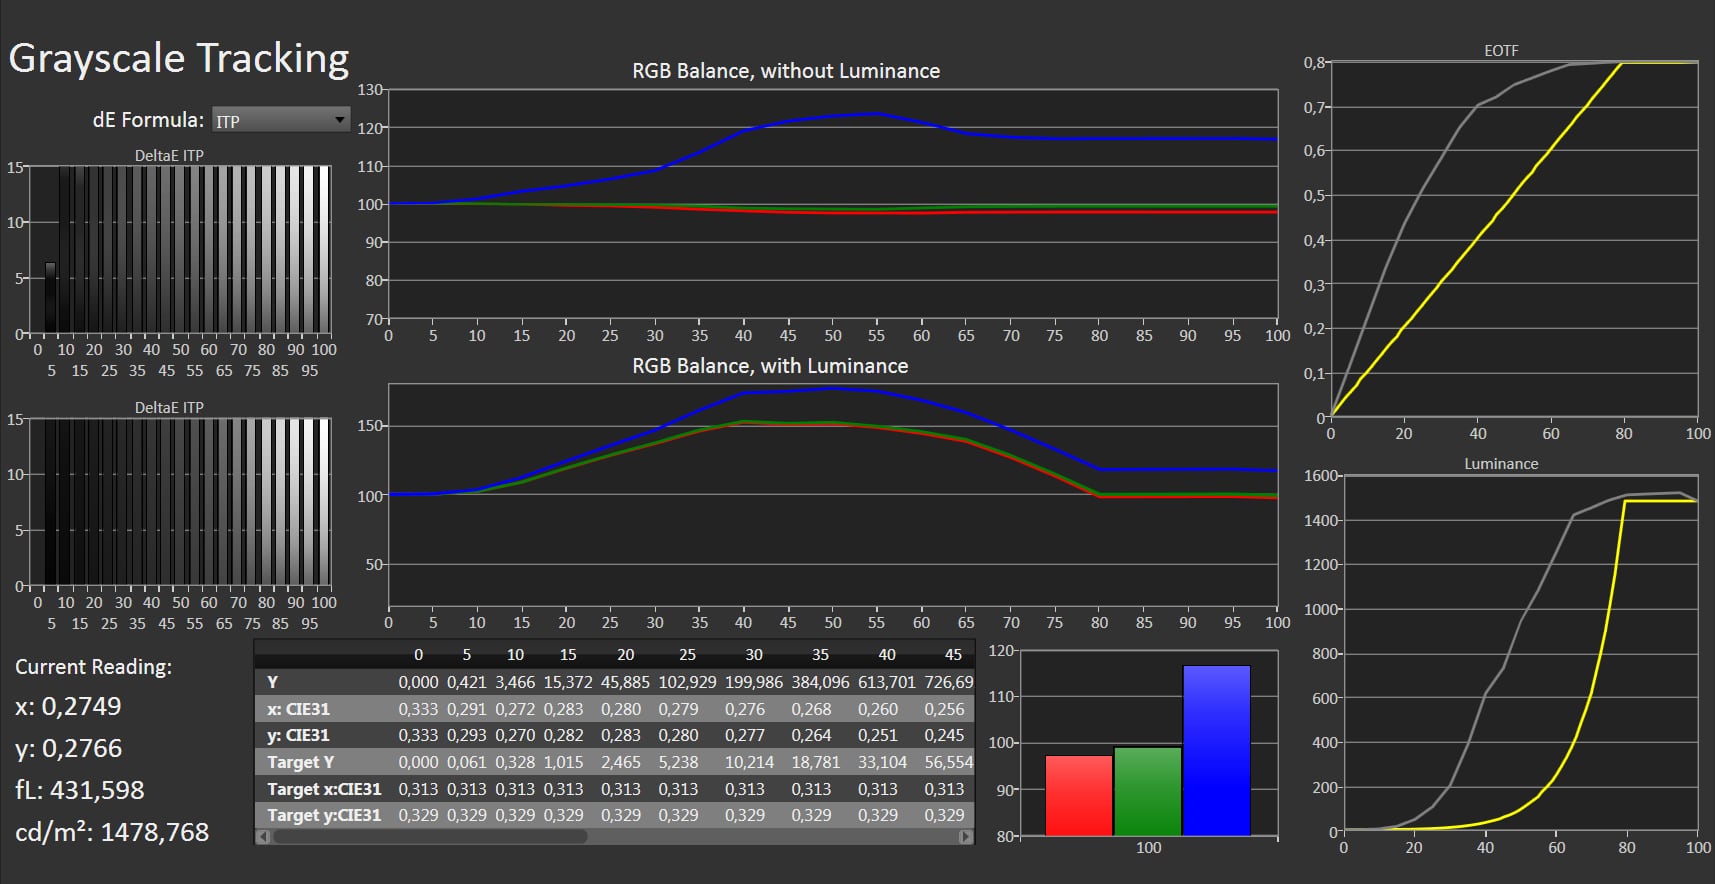
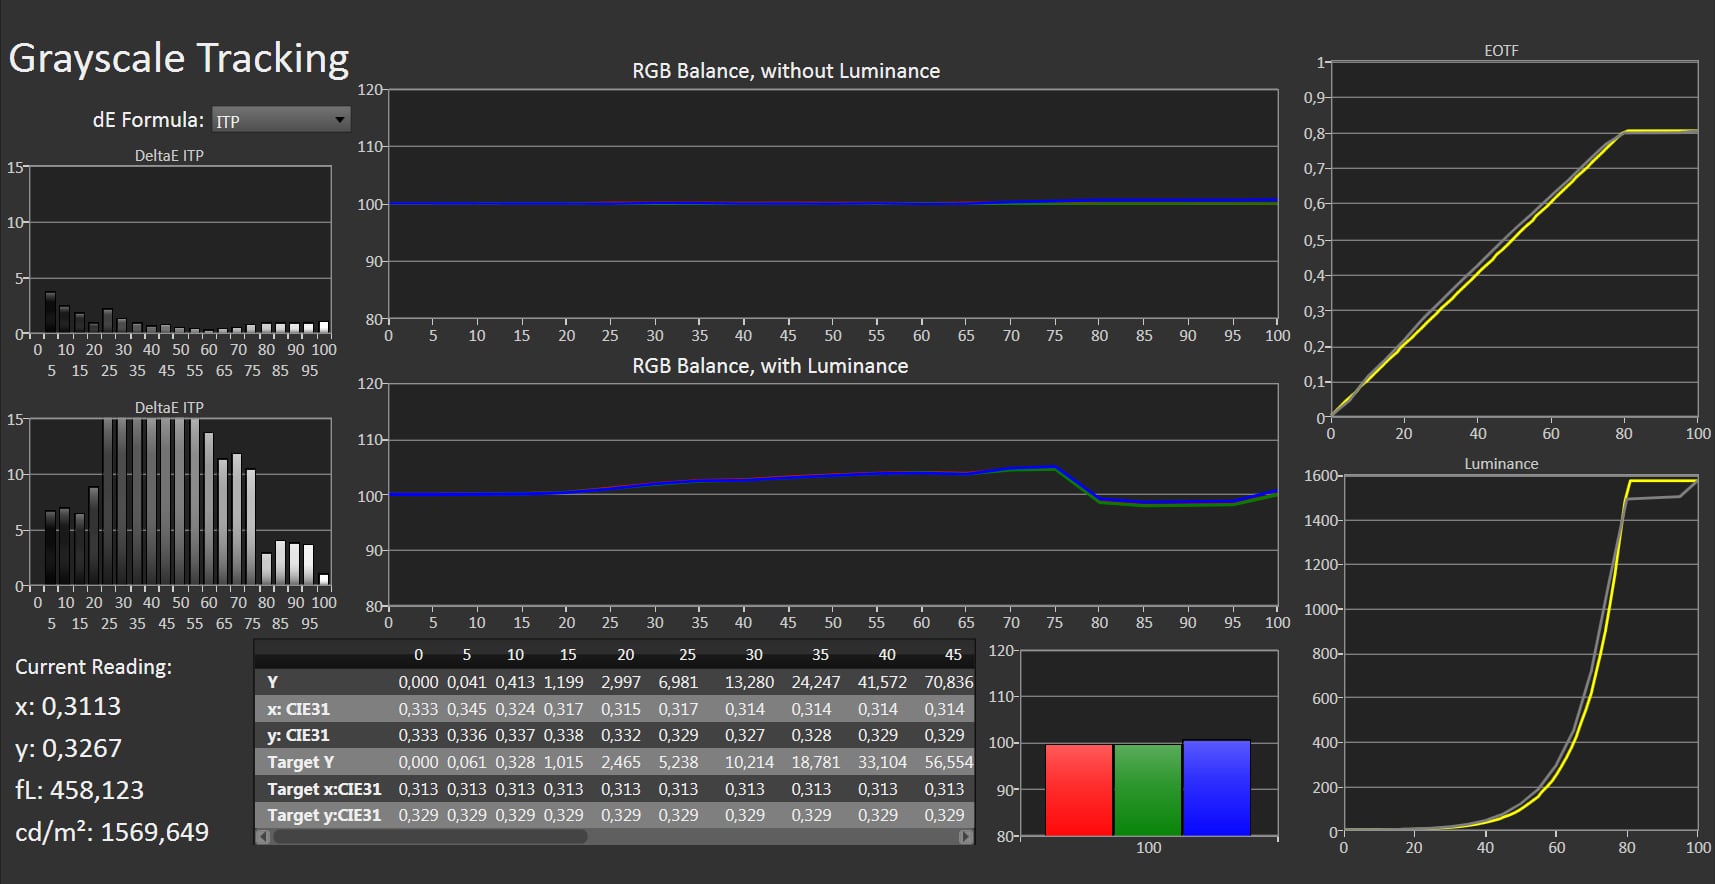
How a TV screen typically looks in its default picture settings. Photo: FlatpanelsHDAs you can see, there are major deviations in both color balance and greyscale. But there is also another problem: the screen expands the colors into a far too wide color gamut for SDR content. If you look at the CIE 1931 graph on the right, the highlighted triangle represents the Rec.709 / sRGB color space – all SDR content is created for this. Pure green should land in the white square at the top, pure red in the one on the right, and pure blue in the one on the left. There are also white squares for the secondary colors (cyan, magenta, yellow). The black square in the center represents the D65 white point – 6500 Kelvin. As you can see, the TV pulls all the primary and secondary colors – except blue – out into a wider gamut. These colors should only be used for HDR content, so as part of the calibration, you also need to find a picture mode in the TV's menu that does not expand the color gamut to the screen's native capabilities. Each manufacturer uses different names for picture modes, but a good starting point is usually to choose the TV's Film/Movie profile or Filmmaker Mode, as these typically avoid expanding the color space. Once you are finished, you can view the results in Calman. On the left below is how the screen rendered color and brightness initially, and on the right (use the slider) you can see how calibration improved the accuracy. In our now quite old article from 2012, you can see what the wrong picture looks like in practice.Left: The TV with its default SDR picture settings. Right: The TV after SDR calibration. Photo: FlatpanelsHDThroughout testing, we performed several calibrations and measurements – first using the C6 HDR2000 + VideoForge Pro (our existing gear), and then with the C6 HDR5000 + G1 (the new gear being tested here). The differences were marginal, and we actually attribute them to the TVs themselves, since we also saw slight variations when measuring twice with, say, the C6 HDR2000. That was not surprising in regard to the C6 meter, since the new one does not differ significantly from the old beyond its brightness certification. But we were surprised by the G1 versus the VideoForge Pro, considering the G1 costs a third – or even less – than older pattern generators. Granted, the G1 does not have a mini-display on the actual device, but we never use the display on the VideoForge Pro anyway. It also lacks a built-in battery, unlike the VideoForge – but again, we rarely use the battery, only when there are not enough power outlets near the TV. Since both the G1 and VideoForge require USB connections to the PC anyway, you end up with the same number of cables either way. The G1 simply draws power from the PC's USB port. In practice, we saw no difference between VideoForge and G1 during the calibration process – not once did the G1 seem slower or lack any functionality compared to the VideoForge.We then moved on to measure and calibrate the HDR performance of the TCL C855 and LG G4. Here it is important to first switch the pattern generator over to an HDR signal (and back to SDR afterward), otherwise you will get completely inaccurate results. As shown in the image to the right, you do this by selecting the dropdown next to HDR and choosing HDR10 or Dolby Vision. Then load an HDR workflow in the Calman app from the menu in the upper left corner. Our examples below use HDR10. Again, we recommend using a 'Window Size' of 10% as a starting point for measurements. HDR calibration requires far more measurements than SDR, which is where a pattern generator really proves its worth. The many extra measurements are due to HDR having a much wider dynamic range in both color and especially brightness, and due to HDR's luminance scale – the EOTF (0-10000 nits) – being an absolute scale as opposed to the relative scale (0–100%) of SDR. The general process, however, remains largely the same. You load your HDR workflow, perform an initial measurement, and then start making adjustments in the TV's picture menu. Since we are focusing on the C6 and G1 here, a full HDR calibration guide will have to be the subject of a future article – it is quite comprehensive. A good starting point, though, is always to check how the pre-calibrated HDR picture modes in the TV perform and pick the best one. With the C6, G1 and Calman, you have the gear and software to go from there. From here, you can start making fine adjustments in the TV's picture menu and advanced menus. We typically use the 'HDR Toolkit' workflow and share a screenshot of the 'Grayscale Tracking' point in Calman in our TV reviews, as it provides a report on both colors and brightness (EOTF), as seen a bit further down. Again, the goal is to get 'RGB Balance' as close to the center of the Y-axis across the entire X-axis from 0 (lowest brightness) to 100 (highest brightness). The measurement of 'EOTF' and 'Luminance' is the gray line in the graphs to the right, and the goal is to get the gray line to follow the yellow line, which is the reference (depending on the screen's maximum brightness in HDR). If successful, the gray line disappears behind the yellow line. DeltaE is again the deviation in colors, where the general rule is that under 2 is good. For HDR calibration, you might consider, if the display is 'Calman Ready', doing a thorough auto-calibration, which can take over 1 hour if it is very detailed, where many individual colors are verified in a plot. To do this, the TV needs to be paired with the Calman app over the network, which is done in the 'Direct Display Control' menu at the top right. In this process, we have experienced the Calman app crashing at times. You select your workflow and target values, and then the software essentially just instructs the G1 and C6, so you can do other things in the meantime. With newer LG and Panasonic OLED TVs, the required test patterns for 'AutoCal' are built into the TV itself, but with newer TVs from Samsung, Sony and Philips, the external pattern generator, namely the G1, is still required. Hisense has also started a Calman partnership, but we have no experience with them yet. We did not perform a full HDR auto-calibration, but again, we can try to show the difference, here with the LG G4 in its 'Vivid' HDR picture profile on the left and Filmmaker Mode HDR picture profile on the right. Pay special attention to the light ('EOTF' and 'Luminance' graphs), which was initially excessively overblown in 'Vivid.'Remember to enable HDR when beginning HDR calibration/measurement. Photo: FlatpanelsHDLeft: Vivid HDR picture mode. Right: Filmmaker Mode HDR. Photo: FlatpanelsHDAgain, in HDR, we didn’t notice any significant differences between the C6 HDR2000 and C6 HDR5000, nor between the VideoForge Pro and Portrait Displays G1. This again speaks in favor of choosing the G1, which is a much cheaper pattern generator. The only difference was small deviations in high brightness levels, but again, we attribute this to the screens, not the measuring equipment. It’s very common for screens, and even more so when a screen like the TCL C855 uses boost in its miniLED backlight, as described in the review of TCL C855 here.We did not notice any significant differences in accuracy between C6 HDR2000 (left) and C6 HDR5000 (right), even though the luminance exceeded 2000 nits. The differences are attributed to the TCL C855's boost function. Photo: FlatpanelsHDIn the test, we used the somewhat more expensive Calman Ultimate software, which offers more options and greater support for meters and pattern generators. It has no effect on the C6 + G1, but with the new bundle, you get Calman Home software, which is specifically aimed at one brand of TV. If you want to calibrate multiple brands, you will need to purchase an additional license for other TV brands or consider buying one of the more expensive Calman software licenses. The workflows that come with Calman Home are also a bit simplified to increase usability, but you can load other workflows or add workflows manually. With Calman Home, you can still perform both manual calibration and auto-calibration.Conclusion
Calibrating a TV still takes a bit of skill and getting used to, but Portrait Displays' launch of a new bundle with the C6 HDR5000 meter, G1 pattern generator, and Calman home software makes it significantly more affordable to get started. At the same time, the increasing number of 'Calman Ready' TVs simplifies the process.Ad:The bundle costs 650 USD, but if you already own a compatible meter (such as C6 HDR2000 or X-Rite), you can get the G1 and Calman Home for 350 USD, which is a far smaller investment than the gear FlatpanelsHD originally purchased (such as the VideoForge Pro pattern generator), that essentially does the same as these newer devices. That, in essence, is the conclusion of the review. With C6, G1 and Calman, you can calibrate most consumer displays for both SDR and HDR – although a license (200 dollars) is required per TV brand, which we find a bit steep. More and more brands can now be auto-calibrated through 'Calman Ready', but we are still not at the point where the meter alone is enough. The system still relies on the Calman app for Windows. There is no app available for Mac or smartphone, which we hope to see in the future. The Windows app takes a bit of getting used to, but it also offers many advanced features if you want to dig deeper. There is still room for streamlining here, and in many cases your calibration will still require quite a bit of manual work. Also remember that a calibration does not turn off motion smoothing and so on. This is something you must do manually in the TV's picture menus. So who is the Portrait Displays C6 + G1 + Calman bundle for? It is not for someone who just wants to calibrate one or two TVs – in that case, it makes more sense to hire a professional. But if you frequently buy new TVs, want to regularly calibrate your displays, or just enjoy tinkering, this is one of the most affordable ways to get started. You can now buy necessary gear at a much lower cost than before.Price and retailer:


