Review: X-Rite ColorMunki Display
TABLE OF CONTENTS Introduction - First impressions - Setup and use - Thrid-party software- Conclusion - Debate
It has been a while since we last time looked at calibration hardware - whether it is for your desktop monitor, laptop or TV. So, we have gotten our hands on the inexpensive X-Rite Colormunki Display device, which has become popular due to its fairly good accuracy and support for third party software such as HCFR.
X-Rite makes several different measuring instruments used for calibrating, and the ColorMunki is one of its cheapest, whereas i1Display is a range of more advanced devices. We already own several other calibration devices here at Flatpanels, so how good is the Colormunki Display?
Subscribe to our Newsletter, RSS, Facebook or twitter to receive notice when new reviews are online.Price and retailer:
| US retailer | UK retailer |
 |
First impressions
In the box we found: the sensor, the installation CD and a short manual. The oblong sensor’s optical element is hidden behind a small white plastic diffuser cap that you see at the top.
The USB cable has a small counterweight element. The counterweight makes sure that the sensor stays on the screen without a suction cup. Even though the USB cable might seem quite long at first, we found it slightly too short for TV calibration. We would have preferred a even longer cable, but as long as you are using it for a PC monitor it is fine.
The X-rite’s front diffuser, which is used when measuring ambient light conditions, and not directly on the screen, sits at one end of the device. When you slide the device around in its housing you see the optics used for measuring colors on the display.
 The optics hides behind the diffuser
The diffuser also serves the purpose of a stand, if required, for example when measuring on a projector screen. At the bottom of the housing you will find a few standard-size screw holes for mounting the sensor on a camera tripod, which makes it easier to place the ColorMunki closer to the projector.

Setup and use
Installation is very easy and smooth. After installation Windows (which was used during the review) automatically detects the USB device as a ColorMunki.
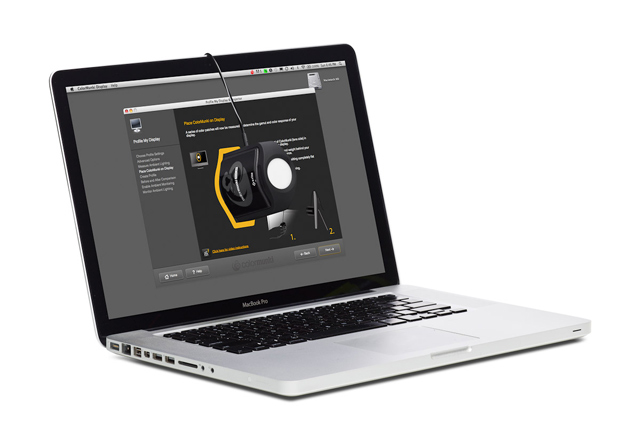
Easy and advanced. Pick the latter
You can calibrate a display by using either the easy or advanced mode. The main difference between the two is the level of freedom. “Easy” offers a very simple calibration process, where you have no options to set a target value for brightness. If you own a monitor without ADC (Advanced Display Controls), all calibrations will be carried out by using a software color profile. This means that if you are not happy about the end result, you have to go back and adjust brightness/contrast, and run the entire process again - the easy way can very quickly become the hard way.

ColorMunki can automatically take the environments into account with ambient light and reflection measurements
In the advanced menu you can specify your target value for the white point and brightness, and you can also choose whether to let ColorMunki monitor your environment for changes in ambient lighting conditions - and adjust the monitor accordingly. Furthermore, you can let ColorMunki measure the level of reflections / glare, and compensate for that element.
By now it is time to mount the ColorMunki on your screen. A good tip is to tilt your monitor slightly, if possible. Since there is no physical adhesion to the monitor you have to rely simply on the counterweight on the USB cable to keep the sensor in place. You may need to adjust the cable or counterweight a bit to make sure that the sensor sits completely level on your screen

The calibration process takes approximately 5 minutes and presents a wide range of colors in full-screen for the sensor to measure. If your monitor supports ADC, the ColorMunki software will automatically adjust the brightness and contrast during this process. If not, you will have to adjust it manually with feedback from the sensor on-screen.
We used 120 cd/m2 brightness as our target value, since it is the recommended level for office use. If you use the ambient light sensor, too, you might have to increase or decrease the brightness level, depending on how dark or bright your environment is.

The end result is a.icm color profile
After completing the calibration process, you can save a color profile that adjusts the primary colors, and Windows will automatically load the profile when you turn on your PC. This also means that you do not have to adjust the color sliders in your monitor’s color menu.

Lastly, you have the chance to see before / after screenshots. In essence, the software just turns on and off the color profile. Hopefully, you see a significant improvement in color reproduction.
If you use more than one monitor (we do), you need to use the calibrator on each of your monitors and assign a specific color profile to each. This is no problem in Windows 7 and forward. For this test we used a Dell 2711WFP and a Dell 2007FP, and the latter received a major boost. It was clear that one of the editors might have neglected his secondary monitor for some time…
If you want the ColorMunki to continuously measure your environment you need to leave the ColorMunki connected to USB port with the diffuser in front of the lens. You can define the interval of how often the device check your room lightings.
The software provides no graphs or otherwise color results after calibration, and this is one of the major differences compared to the more expensive models.
Third-party software
One of the reasons that we chose to to take a closer look at the X-rite hardware is because it supports several third-party software solutions, including the popular HCFR software that can measure gamma curves, RGB curves, color temperature, DeltaE values​​, contrast ratio, and so on. HCFR also presents all your measurements in graphs and tables, which makes it much easier to assess which parameters need to be adjusted.When measuring monitors you usually have only a few sliders in the color menus, but when calibrating a TV you have tons. This is where HCFR becomes handy. In recent years, TV makers have added more advanced calibration options, and even though several manufacturers have integrated color profiles, including ISF and THX profiles that are fairly accurate, you can always squeeze out a bit more.

RGB og DeltaE resultatet for redaktionens Dell 2007FP monitor
In order to use ColorMunki with HCFR you have to close X-Rite’s own software since the sensor can also be used by one application at a time. Note that the X-rite software automatically starts running every time you turn on your PC.
We have a guide for calibrating TVs with HCFR, but at the moment it is only available in Danish on FlatpanelsDK.
We will use the ColorMunki to take measurements on Bang & Olufsen’s new Avant TV.
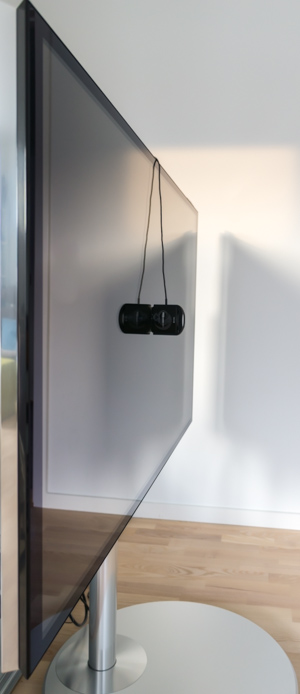
Sensor mounted on the Beovision Avant
Conclusion
X-Rite ColorMunki Display is available for less than $150 dollars. The hardware makes it very easy to calibrate all your screens and it can automatically compensate for changing light conditions in your surroundings.The bundled software offers only a few advanced options, but is very quick and easy to use if you just want to calibrate you monitor by using a color profile. Compared to the more expensive X-Rite i1Display devices you will have to do without the color graphs and reporting features in the bundled software.
However, you can get most of that functionality by using a third party software. X-Rite ColorMunki offers support for several applications including HCFR that lets you do advanced measurements with great reporting, too. If you want to calibrate a TV or projector, this is a must. On the other hand, when calibrating a monitor, you will loose some of the integrated X-Rite features such as automatic ambient light compensation.
All in all, the low-cost, fairly accurate measurements, and the simple calibration process, combined with support for third-party, makes the X-Rite ColorMunki Display a good product for those who want to play around with TV calibration.
Price and retailer:
| US retailer | UK retailer |
| |
 |  |  |
| Pretty good accuracy | Included software lacks advanced features | PC monitors |
| Support for third-party software | USB cable a bit short for TV calibration | TV calibration |
| Ambient light diffuser | Projector calibration | |
| Price |
Subscribe to our Newsletter, RSS, Facebook or twitter to receive notice when new reviews are online.